
[This is part of my FIREPLACE MANTEL-103 series.]
Well here we are, finally, the last post in this series.
Not that I was going for a record, but it’s the longest installation series I’ve written to date; maybe that’s why it took me so long to get around to it.
The hood is surprisingly easy to build, and here’s how I did it.
Variations On a Theme
The look my clients wanted from their new fireplace mantel was one that evoked the massive stone fireplaces often seen in Europe.
One of the ways I achieved this was in the size of the mantel hood. I designed it big.
But yours does not have to be this big. This design could handle a hood half this height and be just as grand.
It’s up to you. Be adventurous. Take my design and improve on it.
Make it your own by changing the moldings and the dimensions or by adding your own combination of ornaments like swags and drops and urns and the like.

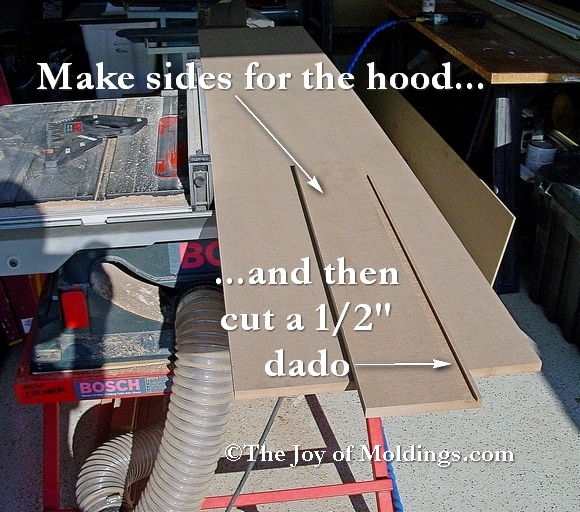
Above The bottom of the hood and the three sides are made from MDF-200.
Below Cut a dado at the bottom of each side so you can wrap them around the very bottom piece.


Wrapping the Hood With Millwork
I used PM-013 in this position, but you can use many other panel moldings here.

CM-004 is an exceptionally detailed profile, and was an easy choice for the mantel hood where it will be one of the first elements that a person sees when approaching the fireplace.
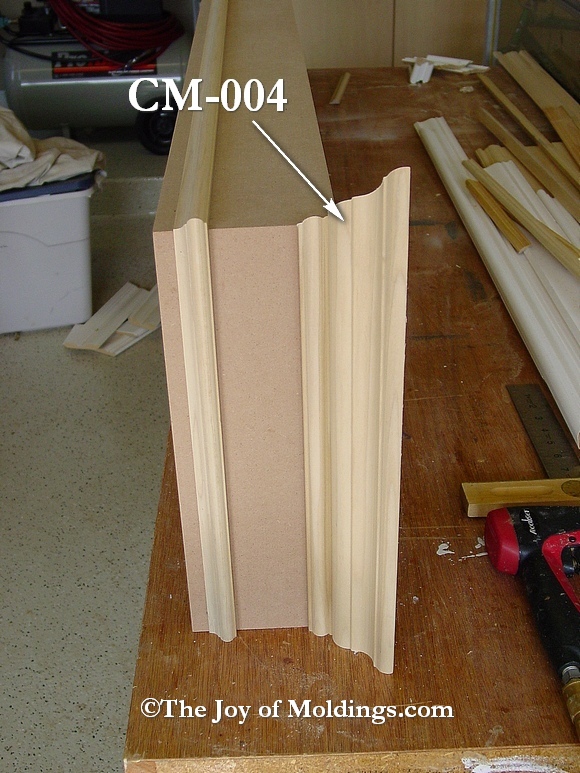
Below The hood looks good just like this, but it needs a top for that finishing touch.

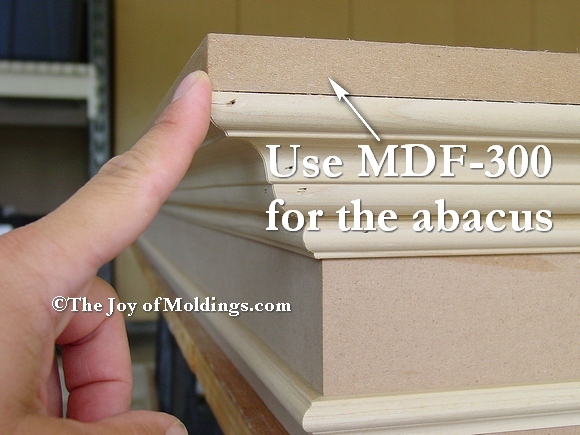
Adding the Abacus
Below I cut a piece of MDF-300 to sit just shy of flush with the top of the crown.
I think it’s safe to call this piece the abacus.
Below This support piece is to make sure that the abacus does not bow over time, especially since the client will be using it for large seasonal decorating arrangements.

Below Glue and nail the abacus in place.

Below PM-009 has a long tradition of being used in this position.
However, if it were my fireplace mantel, I would choose an ornate detail made from compo, perhaps an egg and dart or acanthus motif.

Below This particular piece of PM-009 was not the best quality. It was inconsistent throughout the stick, and that showed up in the miter joints, as you can see in the picture.
Not to worry, a little spackling and sanding will fix it.


What’s Next?
The next step is of course to finish the prep for paint and then apply two finish coats of paint.
If you are not familiar with my techniques for doing the prep work and the painting, then you should read through my very detailed (and surprisingly popular) post How to Paint Moldings.
Thanks for sticking with this very long series of posts. I wish you great success with your own fireplace mantel project.
If you built one based on this design, we’d love to see it. You can send the picture and any comments you’d like to make about your project to me here: Contact Ken.
Posts in this Series
1. How to Build FIREPLACE MANTEL-103 for $333.08
2. How to Build FIREPLACE MANTEL-103 Part 2: Materials Inventory
3. How to Build FIREPLACE MANTEL-103 Part 3: Pilaster Cores
4. How to Build FIREPLACE MANTEL-103 Part 4: Corbels & Inset Panels
5. How to Build FIREPLACE MANTEL-103 Part 5: Shadow Pilasters
6. How to Build FIREPLACE MANTEL-103 Part 6: Wrapping the Crown Molding & Base
7. How to Build FIREPLACE MANTEL-103 Part 7: Pilaster Extensions
8. How to Build FIREPLACE MANTEL-103 Part 8: Lanterns
9. How to Build FIREPLACE MANTEL-103 Part 9: Lantern Crown & Collar
10. How to Build FIREPLACE MANTEL-103 Part 10: Paneled Frieze
11. How to Build FIREPLACE MANTEL-103 Part 11: Making the Hood
12. Before & After: Great Room Fireplace Mantel with Overmantel